Written by Fani Sánchez
Index
What is the robots.txt file?

That is to say, it is a public file that we use to indicate to those crawlers or spiders which part or parts of our web page should not be crawled and indexed. In it, we can specify in a simple way, the directories, subdirectories, URLs or files of our website that should not be crawled or indexed by search engines.
Because is closely related to website indexing, it is essential to program this file properly, especially if our website is made with a content management system (CMS) The system will automatically generate it, since it may happen that parts that should be crawled are accidentally included as non-indexable.
Also called robots exclusion protocol or robots.txt protocol, it is advisory and does not guarantee full secrecy, but we sometimes find it used to keep parts of a website private. Since this isolation is not complete, its use is not recommended to keep certain areas private, as it serves as a recommendation and not as an obligation, being a treat for hackers who, with a browser and the necessary knowledge, can easily access them.
Normally the most common uses are to prevent accessibility to certain parts of the website, to prevent the indexing of duplicate content (e.g. printable versions of the website), or to tell Google what our sitemap is, including its URL in the file.
http://www.example.com/sitemap.xml
How do we create the robots.txt file?
In order to create it, we need access to the root of the domain and upload the text file named “robots.txt” to the top-level root directory of our web server.
http://www.example.com/robots.txt

Robots.txt file elements
Commands
The main commands that we will use in a robots.txt will be
- User-agent are the robots or spiders of the search engines. You can see most of them in this database of web robots. Its syntax would be:
User-agent: [name of the robot to which the rule will be applied] - Disallow tells the user agent not to access, crawl or index a particular URL, subdirectory or directory.
Disallow: [directory you want to block] - Allow arises as against the previous one, with it you indicate to the crawler a URL, subdirectory or directory to which it should enter, crawl or index.
Allow: [URL of a blocked directory or subdirectory you want to unblock]
Specific rules
The rules specified in the Disallow and Allow only apply to the user agents that we have specified in the line before them. Several Disallow lines can be included to different user agents.
Other elements
- Slash “/”, must be attached before the element you want to lock.
- Matching rules are patterns that can be used to simplify the code of the robots.txt file.
Example: *, ?, $
Asterisk (*): locks a sequence of characters
Dollar sign ($): to block URLs that end in a specific form
Most used command syntax in robots.txt
- Indications to a specific bot:
User-agent: [bot name]
User-agent: Googlebot
- Indications to all bots:
User-agent: *
- Blocking of the entire website, using a slash “/”:
Disallow: /
- To lock a directory and its contents, include the directory name after the slash:
Disallow: /directory/
- To block a specific web page, indicate the specific page after the bar:
Disallow: /private-page.html
- Block all images on the website:
User Agent: Googlebot-Image
Disallow: /
- Lock a single image, specifies the image behind the slash:
User-agent: Googlebot-Image
Disallow: /image/private.jpeg
- Block a specific file type, mentioning, after the slash, the extension:
User-agent: Googlebot
Disallow: /*.png$
- To block a sequence of characters, use the asterisk:
User-agent: Disallow: /private-directory*/
- To block URLs that end in a specific form, add the $ symbol at the end:
User-agent: *
Disallow: /*.pdf$
- Allow full access to all robots:
User-agent: *
Disallow:
Another way would be to not use the robots.txt file or leave it empty.
- Block a specific robot or bot:
User-agent: [bot name]
Disallow: /
- Allow tracking to a specific bot:
User-agent: [bot name]
Disallow:
User-agent: *
Disallow: /
When writing them you must take into account that there is a distinction between uppercase, lowercase and spaces.
Testing the robots.txt file in Google
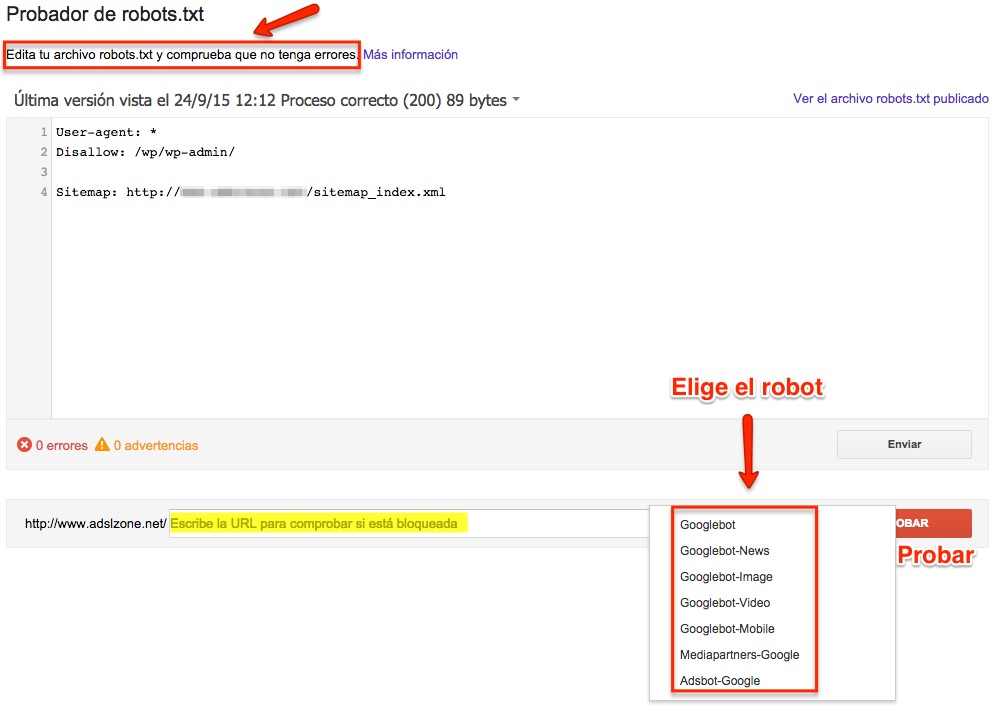
To test the operation of the robots.txt file, we have the test tool for robot.txt in Google Search Console, where you can test and see how the Googlebot will read it, so that it will show you possible errors or defects that the file has or may cause.
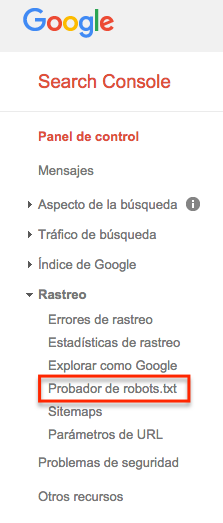
To perform the test, go to Google Search Console and in its control panel, in the Crawl section, choose the option “Robots.txt tester“.

Inside the tester, your current robots.txt file will appear, you can edit it, or copy and paste the one you want to test. Once you have written the robots file to test, select the URL you want to check if it is going to be blocked and the crawler robot you want to test it with.

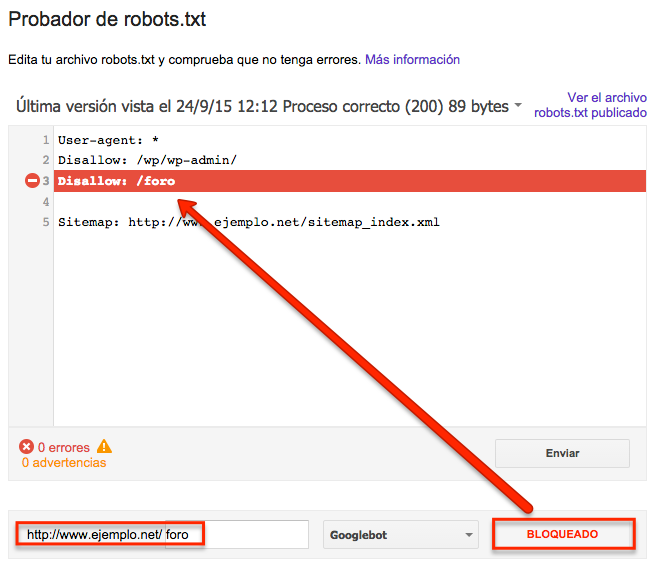
The tool will give you two options: “allowed” i.e. the URL is not blocked, or “blocked”, indicating the line of code that is blocking that URL.

